HITTING THE CEILING
Got a comment from Julio a couple of weeks ago asking how to make a recessed lighting cornice. See beam-me-up-scotty
I thought this would making an interesting little tutorial for my guys and featured it in one of my Revit Lunches, but since then things have been a bit crazy and I forgot all about it. Stumbled across it again today by accident and decided to turn it into a post. Bit rough and ready, but hope some of you find it useful.
This is the (almost) finished article. Should put another light fitting in there to kill the dark spot, but I need to go home to get some sleep so I'm not going to re-make this image today.
This is a ceiling hosted family so go to new family, & choose the ceiling hosted template.
Set up some reference planes with equalised width & length parameters. Create an "opening" and lock the sketch to the ref planes. Might as well make width & length instance parameters so you can easily stretch it to different sizes.
Next we need an extrusion for the sides. This will be a rectangle locked to the same reference planes and "copy-offset" by say 20mm so that we get a hollow box around the edges of the opening.
Go into a side view and create reference planes for the height of the box and the thickness of the upper ceiling board. Then back to plan view to create another extrusion for the upper ceiling.
A simple way to handle this, is to hide the other objects with the sunglasses (temporary hide) tool while drawing the sketch for each extrusion. That way you can only see the reference planes so you know that is what you are snapping to.
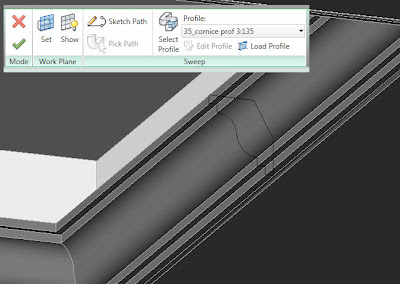
Now we want a cornice moulding. This is a sweep and the path is locked to those same 4 reference planes once again. The profile could be sketched directly in the family, but I prefer to load a profile family. That way I can set a parameter to choose between loaded profiles. Now the family is very versatile within the project. You can set up types with different heights and moulding profiles, and instances with different dimensions in plan.
This is one profile that I created which can be resized using just 2 parameters. Check out the visual below for how this is achieved.
The lights can be loaded directly in the project and placed behind the cornice. I used the "M_Uplight - Strip" family supplied with Revit Architecture. One last tip. To set the equality constraints on the ogee curve in the profile family, you need to "tab select" to persuade the dimension tool to pick up the end point of the arc.
Download the family here : coffer family
I thought this would making an interesting little tutorial for my guys and featured it in one of my Revit Lunches, but since then things have been a bit crazy and I forgot all about it. Stumbled across it again today by accident and decided to turn it into a post. Bit rough and ready, but hope some of you find it useful.
This is the (almost) finished article. Should put another light fitting in there to kill the dark spot, but I need to go home to get some sleep so I'm not going to re-make this image today.
This is a ceiling hosted family so go to new family, & choose the ceiling hosted template.
Set up some reference planes with equalised width & length parameters. Create an "opening" and lock the sketch to the ref planes. Might as well make width & length instance parameters so you can easily stretch it to different sizes.
Next we need an extrusion for the sides. This will be a rectangle locked to the same reference planes and "copy-offset" by say 20mm so that we get a hollow box around the edges of the opening.
Go into a side view and create reference planes for the height of the box and the thickness of the upper ceiling board. Then back to plan view to create another extrusion for the upper ceiling.
By now you have 3 objects all locked to the same reference planes. You want them all locked to the reference planes, and not to each other, otherwise you might get that nasty message saying you have a circular chain of references.
A simple way to handle this, is to hide the other objects with the sunglasses (temporary hide) tool while drawing the sketch for each extrusion. That way you can only see the reference planes so you know that is what you are snapping to.
Now we want a cornice moulding. This is a sweep and the path is locked to those same 4 reference planes once again. The profile could be sketched directly in the family, but I prefer to load a profile family. That way I can set a parameter to choose between loaded profiles. Now the family is very versatile within the project. You can set up types with different heights and moulding profiles, and instances with different dimensions in plan.
This is one profile that I created which can be resized using just 2 parameters. Check out the visual below for how this is achieved.
The lights can be loaded directly in the project and placed behind the cornice. I used the "M_Uplight - Strip" family supplied with Revit Architecture. One last tip. To set the equality constraints on the ogee curve in the profile family, you need to "tab select" to persuade the dimension tool to pick up the end point of the arc.
Download the family here : coffer family


0 nhận xét:
Đăng nhận xét